※ document.write()
=> 테스트 용도로 자주 쓰임
참고:
https://m.blog.naver.com/hadaboni80/221698407490
DOM (Document Object Model)
: 웹문서 다루는 방법
=> 웹문서의 텍스트, 이미지 등의 요소들을 제어
=> 웹문서의 모든 요소(html, css)를 자바스크립트를 이용해 조작할 수 있도록 객체를 사용해 문서 해석
ex.
<script>
window.onload=function(){ //#head 요소 아직 존재 X => body에서 요소 다 읽은 후 수행
var num=10;
var header=document.querySelector("#head"); //header => 문서 객체
//alert(typeof(header)); //object(객체)
setTimeout(function(){
header.innerHTML="DOM을 배우기 시작했습니다";
header.style.color="red";
},3000);
};
</script>
- DOM 트리
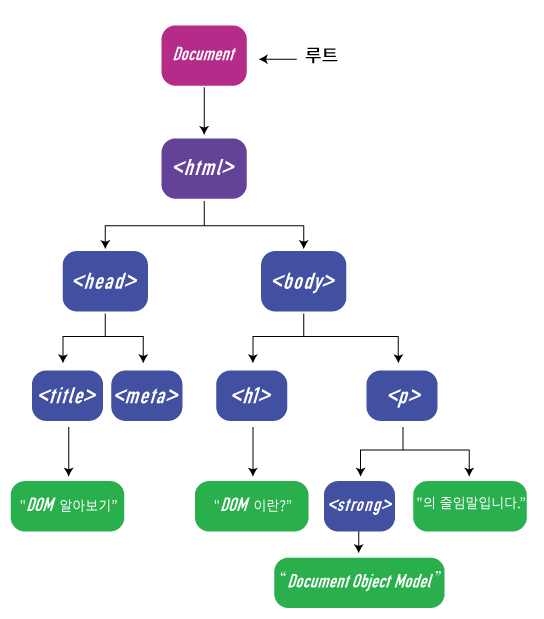
1. 문서 노드 : <html> / 전체 문서 가리키는 document 객체
2. 요소 노드 : <head>, <body>, <title>, <h1> 등 / HTML 태그에 해당, 속성노드와 텍스트 노드를 자식으로 가질 수 O
3. 텍스트 노드 : "~" / 요소노드와 달리 자식노드 가질 수 없음
- DOM의 기능
1. 생성
2. 수정
3. 삭제
DOM 기능 - 생성
- 1. 노드 생성 후 트리에 연결
<script>
window.onload=function(){
//객체 변수 선언
var head2=document.createElement('h2'); //h2 요소노드 생성 //() 사용 유의
document.body.appendChild(head2); //body- h2 연결
var textNode=document.createTextNode("문서객체모델 배우는 중"); //텍스트노드 생성
head2.appendChild(textNode); //head2 요소노드의 자식으로 텍스트노드 연결
/*var image=document.createElement('img'); //img 요소노드 생성
image.src="../images/Penguins.jpg"; //속성 부여1 (최근 웹표준 적용 방식) //객체.속성
image.width=500;
image.height=350;
image.alt="펭귄";*/
var image=document.createElement('img');
image.setAttribute('src','../images/Penguins.jpg'); //속성 부여2 (예전 웹표준 이전 방식)
image.setAttribute('width',500);
image.setAttribute('height',400);
image.setAttribute('alt','펭귄');
document.body.appendChild(image);
}
</script>
- 2. 태그, innerHTML 속성 활용
<script>
window.onload=function(){
document.body.innerHTML="<h2>문서객체모델 배우는 중</h2>"
}
</script>
=> 기존 내용 전체 삭제됨
=> 수정
<script>
window.onload=function(){
document.body.innerHTML+="<h2>문서객체모델 배우는 중</h2>"
}
</script>
<script>
window.onload=function(){
var output='';
output+="<ul>";
output+='<li>김치찌개</li>';
output+='<li>돈까스</li>';
output+='<li>열무김치</li>';
output+="</ul>";
document.body.innerHTML+=output;
}
</script>
DOM 기능 - 수정
- getElementById (동적 제어)
<script>
window.onload=function(){
var head1=document.getElementById('head1');
var head2=document.getElementById('head2');
head1.innerHTML='반갑습니다';
head2.innerHTML='문서객체모듈';
/* cf. DOM 이벤트 처리
head1.onclick=function(){
this.innerHTML='반갑';
}
*/
}
</script>
- querySelector
getElement~ 보다 확장된 기능
ex.
document.querySelectorll('#box1 .target');
=> class, id값 모두 접근 가능
<script>
window.onload=function(){
//var head1=document.getElementById('head1');
//var head2=document.getElementById('head2');
var head1=document.querySelector('#head1');
var head2=document.querySelector('#head2');
head1.innerHTML='반갑습니다';
head2.innerHTML='문서객체모듈';
}
</script>
- getElementsByTagName
<script>
window.onload=function(){
var head=document.getElementsByTagName('h1');
//태그이름이 h1인 요소를 head 변수에 넣음
//태그 여러 개일 가능성 O -> 배열 변수 생성함 (하나만 있어도)
head[0].innerHTML="반갑습니다";
head[1].innerHTML="문서객체모델";
}
</script>
</head>
<body>
<h1 id="head1">안녕하세요</h1>
<h1 id="head2">브라우저객체모델</h1>
</body>
<script>
window.onload=function(){
var content=['반갑습니다','문서객체모델'];
var head=document.getElementsByTagName('h1');
for (var i=0;i<head.length;i++){
head[i].innerHTML=content[i];
}
}
</script>
- getElementsByClassName
<script>
window.onload=function(){
var content=['반갑습니다','문서객체모델'];
var head=document.getElementsByClassName('header'); //'' 누락 시 변수로 인식
for (var i=0;i<head.length;i++){
head[i].innerHTML=content[i];
}
}
</script>
</head>
<body>
<h1 id="head1" class="header">안녕하세요</h1>
<h1 id="head2" class="header">브라우저객체모델</h1>
</body>
- querySelectorAll
=> 모든 종류 (클래스, 아이디) 읽어 배열 형태로 전달
<script>
window.onload=function(){
var content=['반갑습니다','문서객체모델'];
var head=document.querySelectorAll('.header');
for (var i=0;i<head.length;i++){
head[i].innerHTML=content[i];
}
}
</script>
</head>
<body>
<h1 id="head1" class="header">안녕하세요</h1>
<h1 id="head2" class="header">브라우저객체모델</h1>
</body>
- 문제 : p 클릭 시 설명 숨기기
<script>
var onoff=false;
var detail;
window.onload=function(){
detail=document.querySelector('#content .detail'); //요소 선택해 변수에 넣음 (=> 객체 변수)
detail.style.visibility='hidden'; //css=>style 속성
}
function showHide(){
onoff=!onoff; //1차: !onfoff=true 2차: !onoff=false
if (onoff){ //true일 때
detail.style.visibility='visible';
}else{
detail.style.visibility='hidden';
}
}
</script>
</head>
<body>
<div id="content">
<h2>상품정보</h2>
<ul>
<li>상품명 : 휴대용 선풍기</li>
<li>가격 : 20,000원</li>
<li>제조사 : 가나전자</li>
</ul>
<h3 onclick="showHide();">상품 상세 설명</h3>
<p class="detail">휴대용 선풍기 설명입니다.휴대용 선풍기 설명입니다.휴대용 선풍기 설명입니다.휴대용 선풍기 설명입니다.휴대용 선풍기 설명입니다.</p>
</div>
</body>
DOM 기능 - 삭제
<script>
window.onload=function(){
var head=document.querySelector('#header');
head.style.border='border solid red';
head.style.color='orange';
head.style.backgroundColor='yellow';
//css: background-color => js: backgroundColor
var del=document.getElementById('willRemove');
document.body.removeChild(del); //문서 객체 삭제
}
</script>
</head>
<body>
<h1 id="header">자바스크립트</h1>
<h1 id="willRemove">코로나 곧 사라짐</h1>
</body>
- ex 응용: 천체 공전
설명 참고 : https://jizard.tistory.com/330
[Javascript] Canvas 태양, 지구와 달 애니메이션 그리기 (Circle animation)
태양을 중심으로 지구, 지구를 중심으로 달을 움직이는 애니메이션을 만들어보았다. 코딩으로하는 애니메이션에 대해서 그동안 감이 좀없고 낮설었는데, (특히 게임 스크립팅도...) 익숙해질겸
jizard.tistory.com
<script>
window.onload=function(){
var earthAngle=0;
var moonAngle=0;
//객체 변수 선언
var sun=document.getElementById("sun");
var earth=document.getElementById("earth");
var moon=document.getElementById("moon");
//문서 객체의 스타일 속성 변경
sun.style.position="absolute";
earth.style.position="absolute";
moon.style.position="absolute";
sun.style.left="250px";
sun.style.top="250px";
setInterval(function(){
//각도로 지구와 달의 좌표 구함
var earthLeft=250+150*Math.cos(earthAngle); //cos*반지름=원 둘레 위 x좌표
var earthTop=250+150*Math.sin(earthAngle); //sin*반지름=원 둘레 위 y좌표
var moonLeft=earthLeft+50*Math.cos(moonAngle);
var moonTop=earthTop+50*Math.sin(moonAngle);
//위치 이용
earth.style.left=earthLeft+"px";
earth.style.top=earthTop+"px";
moon.style.left=moonLeft+"px";
moon.style.top=moonTop+"px";
//각도 변경
earthAngle+=0.05;
moonAngle+=0.5;
},1000/30);
}
</script>
DOM 이벤트
: 객체에게 취하는 동작
- onclick
<script>
window.onload=function(){
var head=document.querySelector('#header');
head.onclick=function(){
alert('안녕하세요');
}
}
</script>
</head>
<body>
<h1 id="header">나를 클릭해보세요</h1>
<img src="../images/girl.png" alt="girl" id="pic">
</body>
- function
<head>
<meta charset="UTF-8">
<meta http-equiv="X-UA-Compatible" content="IE=edge">
<meta name="viewport" content="width=device-width, initial-scale=1.0">
<title>이벤트로 돔 제어</title>
<script>
var pic;
window.onload=function(){
var head=document.querySelector('#header');
pic=document.querySelector('#pic');
head.onclick=function(){
alert('안녕하세요');
}
}
function changePic(){ ////함수 호출 위해 onload 바깥에 작성!!
pic.src='../images/boy.png';
}
</script>
</head>
<body>
<h1 id="header">나를 클릭해보세요</h1>
<img src="../images/girl.png" alt="girl" id="pic" onclick="changePic();">
</body>
- onclick에 사용자지정함수 연결
<script>
var pic;
window.onload=function(){
var head=document.querySelector('#header');
pic=document.querySelector('#pic');
head.onclick=changePic; //onclick 외 다양한 상황에서 구현 가능
}
function changePic(){
pic.src='../images/boy.png';
}
</script>
</head>
<body>
<h1 id="header">나를 클릭해보세요</h1>
<img src="../images/girl.png" alt="girl" id="pic" >
</body>
- onclick에 익명함수 연결
<script>
var pic;
window.onload=function(){
var head=document.querySelector('#header');
pic=document.querySelector('#pic');
head.onclick=function(){alert('안녕하세요');}
head.onclick=changePic;
pic.onclick=changePic;
document.getElementById('head2').onclick=function(){
this.style.color='red';
this.style.backgroundColor='azure';
}
}
function changePic(){//다양한 상황에서 구현 가능
pic.src='../images/boy.png';
}
</script>
</head>
<body>
<h1 id="header">나를 클릭해보세요</h1>
<!-- <img src="../images/girl.png" alt="girl" id="pic" onclick="changePic();"> -->
<img src="../images/girl.png" alt="girl" id="pic" >
<h2 id="head2">나는 스타일이 변경됨</h2>
</body>
- addEventListener
- addEventListener 매개변수에 익명함수
<script>
window.onload=function(){
var pic=document.querySelector('#pic');
pic.addEventListener("click",function(){
this.src='../images/boy.png';
});
}
</script>
</head>
<body>
<img src="../images/girl.png" alt="girl" id="pic" >
</body>
- addEventListener 매개변수에 사용자지정함수
<script>
window.onload=function(){
var pic=document.querySelector('#pic');
pic.addEventListener("click",changePic)
}
function changePic(){
pic.src='../images/boy.png';
}
</script>
</head>
<body>
<img src="../images/girl.png" alt="girl" id="pic" >
</body>
<script>
window.onload=function(){
var pic=document.querySelector('#pic');
pic.addEventListener("click",changePic);
pic.addEventListener('mouseover',changePic);
pic.addEventListener('mouseout',originPic)
}
function changePic(){
pic.src='../images/boy.png';
}
function originPic(){
pic.src='../images/girl.png';
}
</script>
</head>
<body>
<img src="../images/girl.png" alt="girl" id="pic" >
</body>
<style>
#rect{
width: 100px;
height: 100px;
border: 1px solid #000;
margin-left: 100px;
}
</style>
<script>
window.onload=function(){
var pic=document.querySelector('#pic');
var myRect=document.querySelector('#rect');
pic.addEventListener('mouseover',changePic);
pic.addEventListener('mouseout',originPic)
myRect.addEventListener('mouseover',function(){
this.style.backgroundColor='green';
this.style.borderRadius='50%';
this.style.transition='all 1s';
});
myRect.addEventListener('mouseout',function(){
this.style.backgroundColor='';
this.style.borderRadius='';
});
}
function changePic(){
pic.src='../images/boy.png';
}
function originPic(){
pic.src='../images/girl.png';
}
</script>
</head>
<body>
<img src="../images/girl.png" alt="girl" id="pic" >
<div id="rect"></div>
</body>
'Programming > 국비학원' 카테고리의 다른 글
| 220708 - 자바스크립트 - DOM 제어 / 제이쿼리 (0) | 2022.07.11 |
|---|---|
| 220707 - 자바스크립트 - DOM, 이벤트 (0) | 2022.07.08 |
| 220705 - 자바스크립트 - 객체, BOM (0) | 2022.07.06 |
| 220704 - 자바스크립트 - 객체 (0) | 2022.07.05 |
| 220701 - 자바스크립트 - 객체 생성, 객체의 배열화, 내장 객체 (0) | 2022.07.02 |
